Mutation Tests
While testing methods like unit tests, fuzz tests, and invariant tests help verify that your code works as expected, mutation testing takes a different approach by verifying that your tests can actually catch bugs. It works by automatically introducing small changes (mutations) to your code and checking if your test suite catches these intentionally introduced bugs.
Think of mutation testing as a "test for your tests" - it helps ensure your test suite is robust enough to catch potential issues. For smart contracts where security is paramount, having strong test coverage isn't enough - you need to ensure your tests can actually detect problematic changes.
How Mutation Testing Works
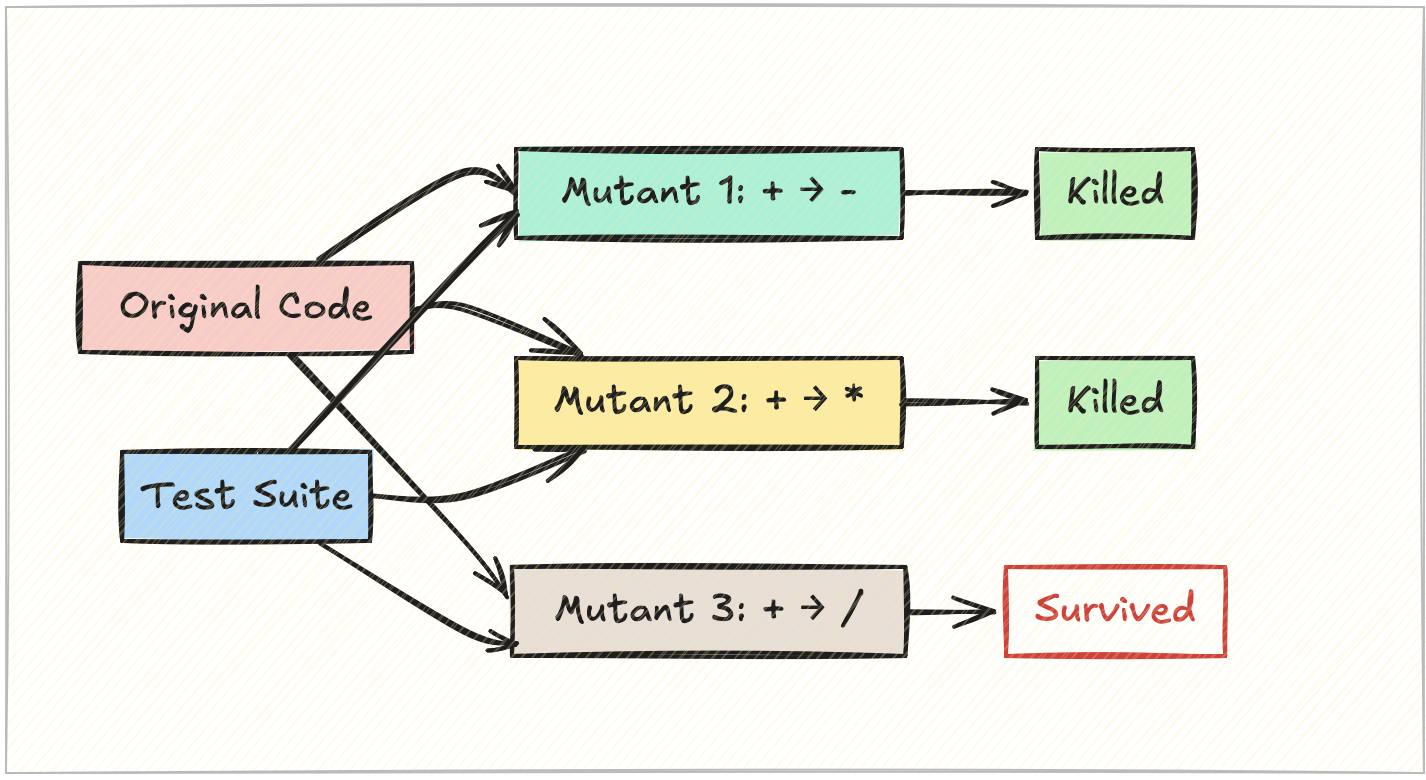
- The mutation testing tool creates copies of your smart contract
- In each copy, it introduces a small change (mutation) like changing a
+to a-,>to<, ortruetofalse - It runs your test suite against each mutated version
- If your tests fail, that's good! It means they caught the mutation
- If your tests pass, that's concerning - it means they missed a potential bug
A mutation that survives (i.e., tests pass) is called a "mutant" and indicates a weakness in your test suite.
Common Mutation Operators
Some typical mutations that are used:
- Arithmetic: + → -, * → /, += → -=
- Boundary: > → >=, < → <=
- Boolean: true → false, && → ||
- Integer: increment/decrement values
- Assignment: = → +=
- Removal of Modifiers like
onlyOwner,whenNotPaused, etc.,
[!TIP] Unlike other tests, this can come as a last resort. This is a very optional testing method as I personally didn't find it much useful. But it could be useful for your usecase, who knows. So it's good to include mutation testing in your pipeline if you got some spare time.
Using Vertigo with Foundry
Let's look at a practical example using a token vesting contract. We'll use vertigo-rs, a mutation testing tool by RareSkills with Foundry support to assess and improve our test coverage.
Follow the steps in the vertigo-rs github repo, to setup and install it on your machine.
// Vesting.sol
    function initialize(
        address _beneficiary,
        uint256 _vestingDuration
    ) external onlyOwner onlyInState(VestingState.Uninitialized) {
        // Validate input parameters
        if (_beneficiary == address(0)) {
            revert ZeroAddress();
        }
        if (_vestingDuration == 0) {
            revert ZeroDuration();
        }

        beneficiary = _beneficiary;
        vestingDuration = _vestingDuration;
        state = VestingState.Initialized;

        emit VestingInitialized(_beneficiary, _vestingDuration);
    }


    function startVesting()
        external
        onlyOwner
        onlyInState(VestingState.Funded)
    {
        vestingStart = block.timestamp;
        state = VestingState.Vesting;
    }

 ...

    function pause() external onlyOwner {
        if (paused) {
            revert AlreadyPaused();
        }
        paused = true;
        emit VestingPaused();
    }

    function unpause() external onlyOwner {
        if (!paused) {
            revert NotPaused();
        }
        paused = false;
        emit VestingUnpaused();
    }
Unit test file:
// Vesting.t.sol
contract Vesting_UnitTest is Test {
    Vesting public vesting;
    MockERC20 public token;
    address public owner;
    address public beneficiary;
    uint256 public vestingDuration;
    uint256 public totalAmount;

    function setUp() public {
        owner = address(this);
        beneficiary = address(0x1);
        vestingDuration = 365 days;
        totalAmount = 1000 ether;

        vesting = new Vesting();
        token = new MockERC20("MockToken", "MTN");
        token.mint(owner, totalAmount);
    }

    function testStartVesting() public {
        vesting.initialize(beneficiary, vestingDuration);
        token.approve(address(vesting), totalAmount);
        vesting.fund(IERC20(address(token)), totalAmount);
        vesting.startVesting();

        assertEq(uint256(vesting.state()), uint256(Vesting.VestingState.Vesting));
        assertEq(vesting.vestingStart(), block.timestamp);
    }
}
Running Vertigo on this test suite:
vertigo run
Output might showing surviving mutants:
Mutation testing report:
Number of mutations:    15
Killed:                12 (80.00%)
Survived:              2 (20.00%)
Runtime:               8.12 seconds
Mutations:


[+] Survivors
 * Mutation:
    File: /solidity-testing-book/examples/src/Vesting.sol
    Line nr: 163
    Result: Lived
    Original line:
             function pause() external onlyOwner {

    Mutated line:
             function pause() external  {

Mutation:
    File: /solidity-testing-book/examples/src/Vesting.sol
    Line nr: 171
    Result: Lived
    Original line:
             function unpause() external onlyOwner {

    Mutated line:
             function unpause() external  {
These surviving mutants reveal gaps in our test coverag as you can see we don't have tests to make sure only the owner can pause/unpause the contract.
  function test_Pausability_onlyOwner() public {
        vm.expectRevert(
            abi.encodeWithSignature(
                "OwnableUnauthorizedAccount(address)",
                address(0xcafe)
            )
        );
        vm.prank(address(0xcafe));
        vesting.pause();

        vm.expectRevert(
            abi.encodeWithSignature(
                "OwnableUnauthorizedAccount(address)",
                address(0xcafe)
            )
        );
        vm.prank(address(0xcafe));
        vesting.unpause();
    }
Let's run Vertigo to check if the new tests kill the mutants.
Mutation testing report:
Number of mutations:    15
Killed:                15 (100.00%)
Survived:              0 (0.00%)
Runtime:               8.45 seconds
Awesome, we can see that by adding new tests validate all mutants are killed showing our tests became stronger by covering more cases.
When to Use Mutation Testing
Eventhough mutation testing can be valuable in certain scenarios, there can be some trade-offs:
- Runtime can be slow as each mutation requires a full test run
- Higher rate of generating false positives that need manual review
- Best used on core contract logic / math heavy functions rather than auxiliary functions
Best Practices
- Start with unit tests and invariant tests before mutation testing
- Focus on critical functions first - don't try to achieve 100% mutation coverage everywhere
- Use mutation testing results to identify areas needing more test cases
- Add test cases that specifically target edge conditions highlighted by surviving mutants
- Document why certain mutants were ignored if they represent impossible scenarios
Conclusion
Mutation testing adds another layer of confidence to your smart contract testing strategy. While it requires more computational resources than traditional testing, the insights it provides about test suite effectiveness can be quite useful in some scenarios. Use it strategically on your most important code paths to maximize its benefits. If you got that additional spare week before sending your contracts to audit, you can quickly use the mutation test tools to strengthen your testsuite.